We will in
this post describe in detail how our smartphone application work and the product development
process. We would be gladly happy if you followed this link
to test out our smartphone application. We have created our prototype by using the prototype tool
MyBalsamiq. MyBalsamiq was chosen mainly from its simplicity and that every
team member could be invited to the project. MyBalsamiq works in a very simply
way, we just need to create mockups,
that should illustrate our app. This prototype is the first prototype that we have
created since the paper
prototyping and sketches
that we made during the previous exercises. When creating this prototype we
mainly took the designed from the sketches and re-designed them.
After we
hade gone through the feedback that we got during exercise 4, we started to
discuss the improvements with our product and started to iterate the design to
create a more high fidelity
prototype. When designing our product we had always in mind the Fits law, we tried to
place every button/icon in a way that satisfied that law. We also tried to
visualize how our users would be satisfied with our product by thinking on how
our personas would
like our app and also how well it fits there scenarios. During the development we always
thought of making our product to achieve the usability goals and user experience goals that we previously have
discussed in the group. The usability
of the apps interface was very important for us, because people without any
major knowledge of smartphone should be able to us our product. So we tried to make
the product very understandable and easy to use.
This is the design of our first prototype by using the prototype tool MyBalsamiq:
 |
| Main menu |
When you
start our app you will directly get to the main menu, where you choose between the
different categories to get more information about or search after a specific
topic that you need more information. At the bottom menu we have highlighted
where on the application you are so that the user know on which categories they
are watching. When clicking on one of the categories you will get to the Food,
Amusement, Transport or City Walks menu.
 |
| Amusement Subcategory |
 |
| Transport Subcategory |
 |
| City Walks Subcategory |
 |
| Food Subcategory |
In the subcategories
of the food category the user will get options on what kind of food the user
would like to eat and if the user wants to search for a specific type of food,
they can do that manually by typing on the search box. On the design concept we had
discussed that you should be able to swipe to the right to get to the map view
where all of the restaurants have been marked on the map but it’s hard to show
in a conceptual design
due to the fact that the prototype tool we used doesn’t support a swipe
function. We solve this problem by creating a small menu bar where the user can
click on 3 different options where option 1 activates the users smartphone
camera and the user can get guided tour by pointing the camera towards building
or places, option 2 will get you to the main menu and option 3 replaced the
swipe function, by clicking on Map you will get a map view with all of the
restaurants marked on the map and the user location will also be showed. The
map also works offline due to the fact that one of the major requirement that we had
set was that our app should work when users don’t have any internet connection.
 |
| Map over the restaurants that are near the user |
 |
| Restaurants information |
 |
| Road map over the route |
When
clicking on one of the subcategories of the food category you will get a map
view where all of that food type have been marked on the map. By clicking on
one of the red dots on map (where the red dots indicates where the restaurant
is located) you will get information on the restaurants name, working hours and
how to get there by walking or by public transportation or taxi. If the user
click on the walk button, the user will get a map where the user location have
been marked and route on how to get there. The route uses the smartphones GPS function
and also works offline.
 |
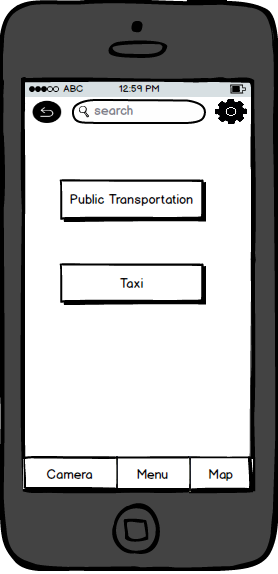
| Choice of transportation |
 |
| Taxi options |
 |
| Ferry Options |
In the
subcategories of the transport category the user can plan your route and then
choice what kind of transportation you want to travel with by clicking on the
choice of transportation button. You can then choice between public
transportation or taxi.
 |
| Map over the ferry route |
 |
| Payment |
When
clicking on the public transportation interface you can choose between travelling
with different transportations, buss, ferry, tram etc. Clicking on the start
button will bring the you a map where the travel route and the price is
showed. If the user chooses to travel
with this route, the user can then click on the payment button. The user can
then select the amount of travellers and choose between different payment
options. When clicking on the pay button, a ticket have been purchased.
 |
| Information about Vasa Museum. |
In the subcategories of the amusement category the user can get information about the different amusement parks around Djurgården. By clicking on a amusement park, the information on that park is described and if the user wants more information then they can click on the wiki text.
 |
| Historical Walk |
In the
subcategories of the city walk category the user can plan different city walks
that have been created for the user.


Inga kommentarer:
Skicka en kommentar